
DIY Concrete Countertops and Sinks
I have always been a DIY guy. Growing up,  my dad fostered my engineering curiosity by giving me tools and time to explore how things were put together. I took those skills and knowledge I gained, and as a teenager, I spent my summers during high school and college working for small construction companies learning everything from framing, roofing, decks, patios, and cabinet making. I picked up many skills and was granted liberties to use the company's shop for my own side projects. I learned I prefer to do just about anything myself rather than pay someone to do it for me.
Throughout my adult life, I’ve taken on different projects around my home like building a deck, creating a retaining wall, and designing a swingset/playhouse for my children. One of the bigger projects I took on was a first floor renovation. I recall at the end of 2011, during the week between Christmas and New Year's Day, I began ripping up the carpet, linoleum, and oak hard wood from the first floor of our home. I was creating a brand new space, and the ideas began to swirl. It was about this time that the idea of constructing my own concrete counter tops came to mind. After a bit of research, I ultimately decided fabricating countertops for the kitchen was too risky for a first-time project. I was still intrigued with the idea of building something with concrete. I began to think about what I could do with concrete on a smaller scale. I remembered seeing a concrete sink at a restaurant and knew this would be the perfect project to complete the renovation.
Through my research of vanity and concrete sink tops, I found a few websites dedicated to concrete projects including https://www.buddyrhodes.com/ and http://www.concreteexchange.com/. The second website also included great how-to videos by Fu-Tung Cheng. Cheng gave practical advice and instructions on how to bring my ideas to reality. I bought his book, concrete countertops made simple, and purchased his “countertop mix” because its ease of use. The concrete is packaged and sold in small bags, premixed with the precise amount of pigmentation, fiber reinforcement, and plasticizers need to add to 120 lbs of bagged 5000 PSI Sakrete.
Here is a calculator to estimate the raw materials needed for a ramp sink (CLICK HERE).
I wish I could find the image that I found for inspiration, but it has been lost to time. That image fueled my desire to complete this project and led me to push myself to create a slotted concrete sink. I first built a sturdy vanity from zebrawood to serve as the base for the sink. Using the lessons I learned from Fu-Tung Cheng’s book and online articles, I created a template of the top of the vanity and began building the sink form from melamine (melamine at Home Depot). Melamine is an inexpensive particle board coated with a waterproof layer which makes for a perfect for constructing concrete forms.
Speaking of forms, there are two schools of thought when building concrete countertops;
- Pour in place by building the form directly on the cabinet bases (https://www.youtube.com/watch?v=p1W9y_Gx8vc) If this is even possible to do with an integrated sink, it would be very complicated.
- Form and pour into an upside down mold (https://www.youtube.com/watch?v=iu8v_0HPigc). This is the direction I decided to take. I formed and poured upside down because it guarantees to give a flat top and allows for doing the very messy job of wet grinding and polishing the concrete outside.
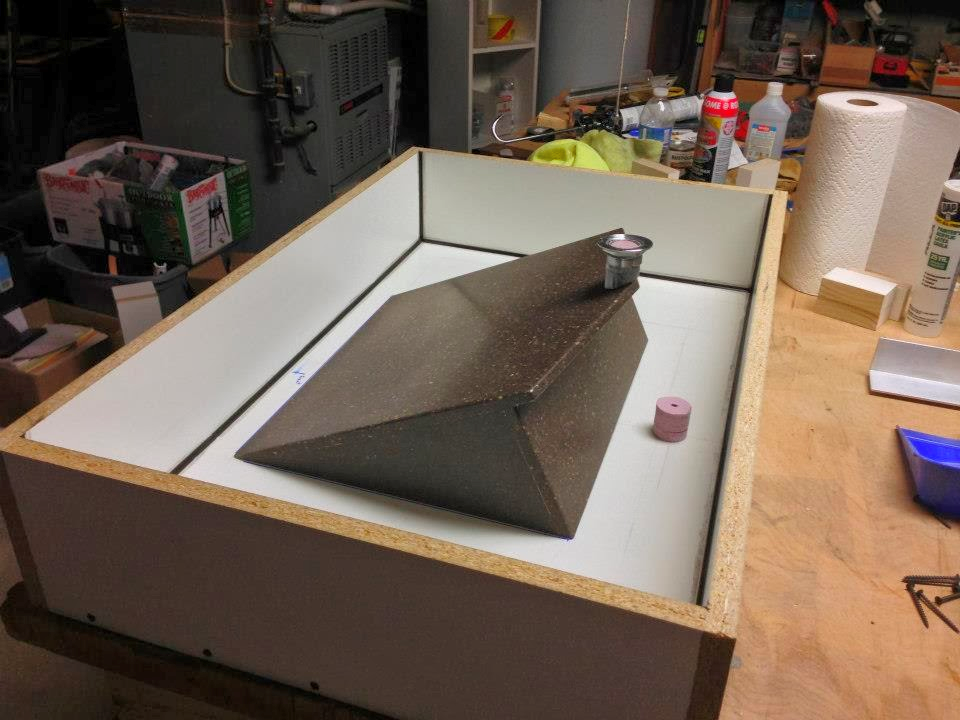 Here you see the form for the integrated vanity top and sink. It might be difficult to visualize here, but think of it as a reverse negative of the final product, i.e. you are looking at the underside of the sink. All the seams of the melamine are sealed with black silicone caulk. This is a crucial step as the caulk not only seals the seams from leaking during the pour, but it also forms the soft radius edge of the concrete top after being released from the mold. Using black caulk on the white melamine allows for a good visualization for any imperfections. The bowl portion of the sink was formed with some solid surface countertop material that I was able to scavenge. Note the knockout for the faucet and the drain tailpiece. They are made from ridged core foam insulation that can be easily removed after the concrete is cured. The drain knockout also has a brass drain to tailpiece connector to allow a threaded tailpiece to be used to connect the plumbing to the sink drain.
To keep the top as “less heavy” as possible, I created some forms to be inserted during the pour along with rebar to reinforce the concrete. Below is the full mold showing how the concrete will cure.
Pouring the concrete should be done on a perfectly level table. I built a sturdy table on some sawhorses and improvised a vibrator from an old motor I had by adding a weighted, unbalanced wheel and mounted it to the underside of the table.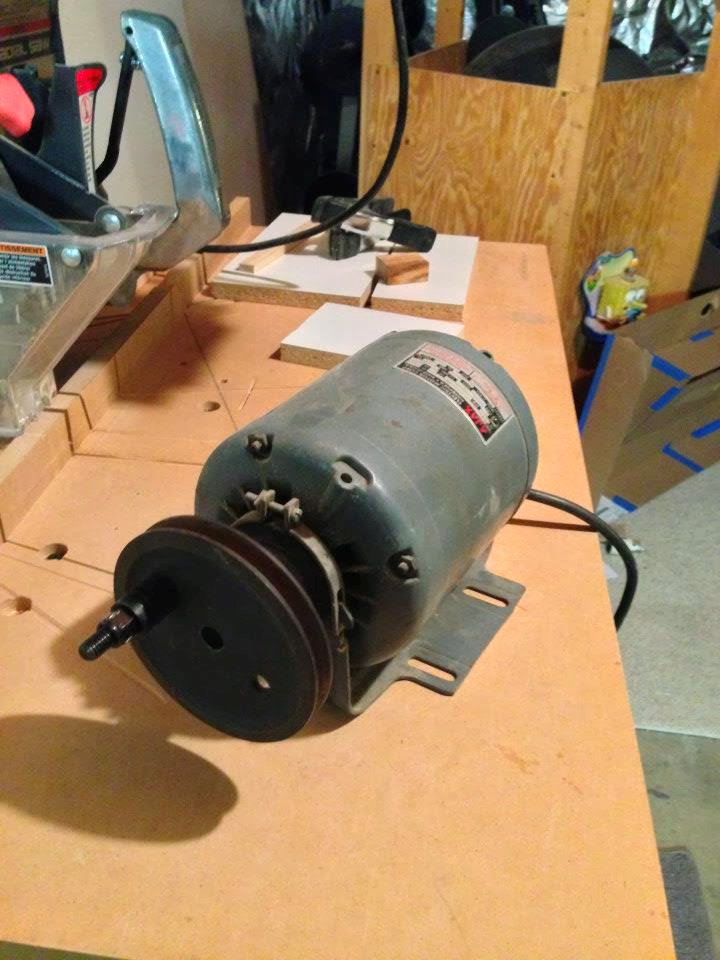
The vibrator was only used sporadically during the pour to help settle the concrete in the form, eliminating voids. Over vibration may cause the aggregate in the concrete to settle to the bottom of the pour.
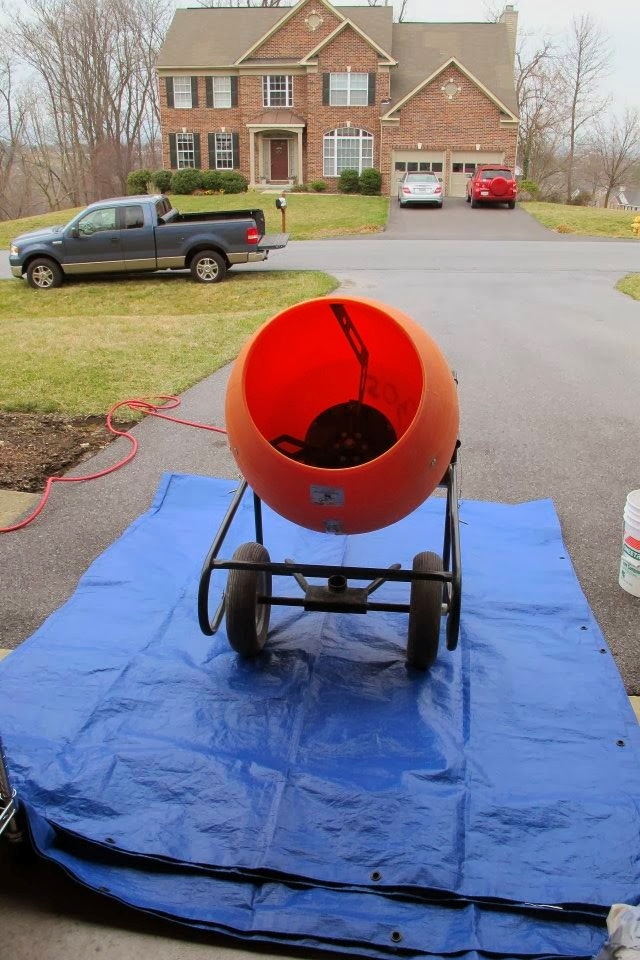 To ensure the concrete countertop mix was thoroughly mixed with the Sakcrete, I went ahead and rented a mixer from Home Depot.
I carefully mixed the Cheng Countertop Mix with the Sakcrete 5000 PSI mix following the instructions for adding water detailed by the Cheng Conutertop Mix. You want the concrete to be less wet than if you were pouring a slab, and too much water can significantly weaken the final product.
Just before starting the pour, I sprayed all the surfaces with a release agent, poured one inch of concrete into the form, and then added rebar. Two bars were placed on either side of the faucet knockout and I put mesh wire around the bowl of the sink. Notice the line I drew around the inside perimeter of the form. That line represents the thickness of the top of the counter, and I wanted the rebar to be right in the middle of that section.
Also note the “L” shaped melamine brackets I made to secure the form on the table while pouring and vibrating the concrete. They are screwed in place, and the screw heads are covered with tape to make sure the heads do not get accidentally covered with any concrete, thereby making them difficult to remove. Here you can see the wire tie used to keep the rebar suspended at the proper depth in the pour.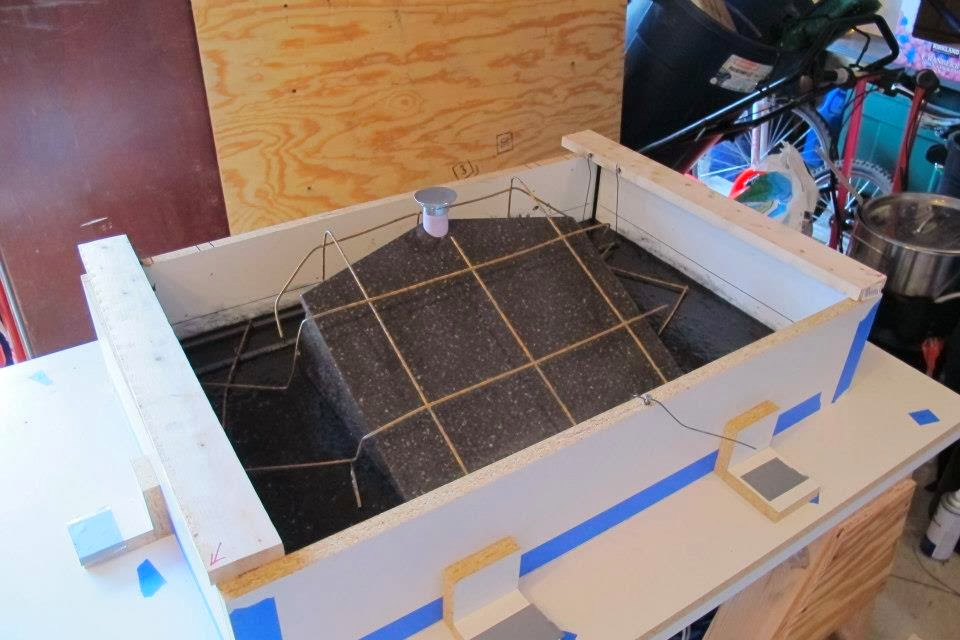
Continuing to pour to the 2-inch line on the form and then placing the internal form in place, I continued to hand pack the concrete around the sink bowl. Though the internal form was secured to the main mold, it was wanting to “float” up as more concrete was being poured. I took some galvanized steel pipe and used electrical wire as a heavy-duty twist tie to keep the internal form in place.
As I continued to fill the sink bowl, and occasionally vibrate the table, the concrete did not want to stay where it was placed and instead was slumping down more than I anticipated. I ended up using some 1 X material to help hold the ramp of the bowl in place.
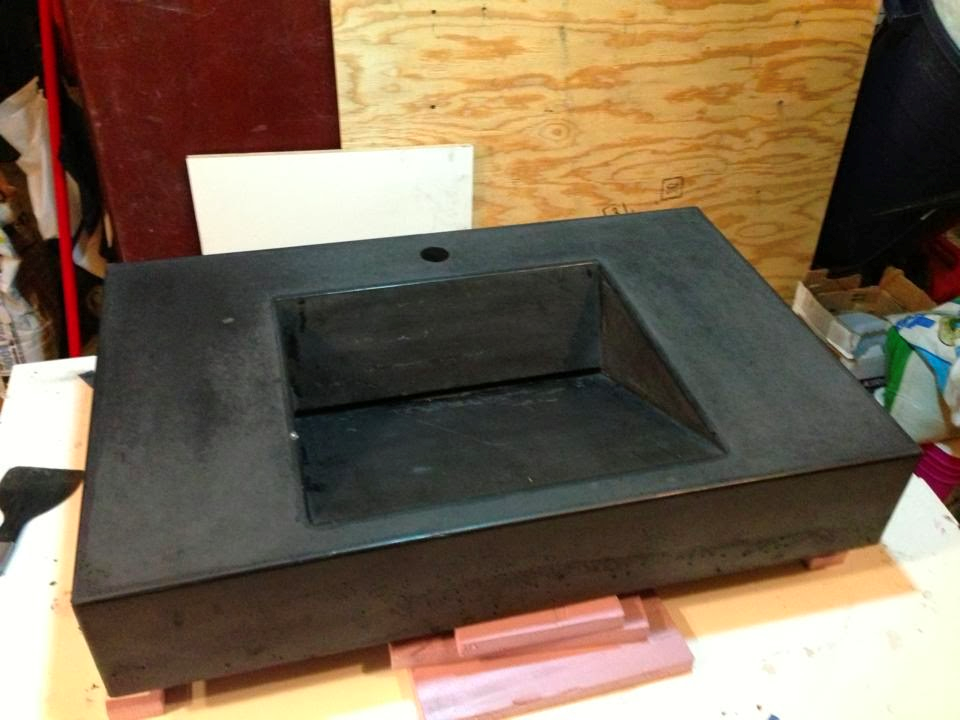
At this point, I covered the pour with a tarp, kept an electric heater under the table to allow the concrete to cure slowly without drying out. After three days, I began demolding the top. The melamine forms released easily, but the slot drain portion that was completely captured by the concrete proved to be very stubborn. I used pry bars and even had to use an oscillating flush cut saw to plunge cut into the solid surface material in the slot and allow it to collapse upon itself a bit. It finally came out and you can see some scratches near the slot drain where I really had to work to get the form to release. The scratches were removed during the wet grinding and polishing process.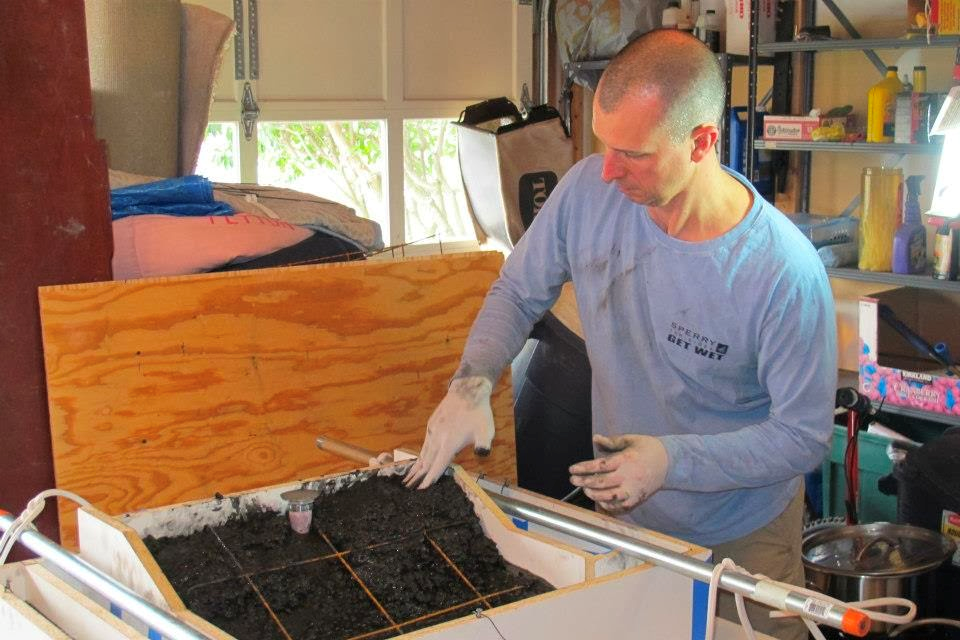
Unfortunately, I didn’t take any photos of the wet sanding, polishing, and sealing of the concrete. This is wet sander I purchased (WET SANDER). I completed these steps outside on a pair of sawhorses. It was a typical sanding process, starting with the most aggressive grit and sequencing through to the finest grit. I then used this matching acrylic slurry (SLURRY) to fill any small pits and voids that remained on any surface.
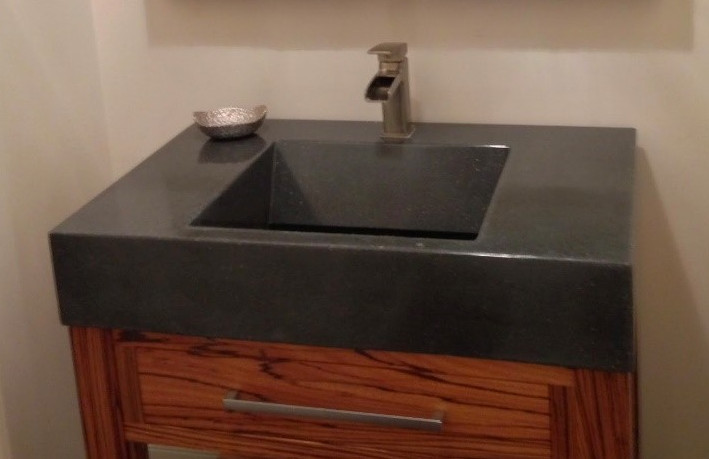
Finally, I applied several coats of sealer (SEALER COAT). After allowing the sink to dry, I installed the sink on the base on the vanity and connected the plumbing supply and drain. Here is the final product.
 Oddly enough, shortly after I finished this project, Cheng Concrete Exchange sponsored an international, “Makers Challenge.” and I entered this project and won the “People’s Choice Award.” I loved how it turned out and was happy that others saw the beauty as well.
Building a concrete sink turned out to be a good choice for my first concrete project. The resources I found online helped guide my project and along the way I picked up more firsthand understanding of the dos and don’ts of creating with concrete. If you have any questions about your own project, I am happy to help you any way I can.
Message from vCalc: Andy Seaman is a software engineer and DIY enthusiast. Andy lives with his family in suburban Maryland, and has been a friend of the vCalc founders for decades. Thanks for sharing your knowledge and experience.
DIY Countertop Calculators
- Comments
- Attachments
No comments |